This article was written by Ron Clifton for Bowling This Month Magazine and may not be copied or reproduced without written consent from Bowling This Month.
 

The Six Basic Fundamentals Part 3

Criteria for ball fit continued


In this series I am going through my six basic fundamentals and how they are interconnected. With ball fit being #1 on my list and it being so critical to the armswing and release, I decided to continue the discussion as part three of “The Six Basic Fundamentals”. I last left you in charge of getting your thumbhole snugness sorted out so next we move into checking your span and pitches.

Hopefully a competent pro shop near by can get you close on the span as well as finger and thumb pitches but there is no substitute for trial and error. That means drilling balls and making single small changes until you get it right… and what is right today may not be right next year. This is a very fluid sport and everyone that strives to stay on top of it is doomed to be forever changing their ball fit.

The best that we can hope for is a fit that allows us to throw the ball better today than we did yesterday and without injury. Just in case you run into a driller that is cocky enough to say “I can fit you perfectly the first time” just ask him how many times he has re-fit himself. I personally thought I was pretty much finished with changing my ball fit, but between the time I wrote part one of this series and finished part two I lengthened my span one eighth of an inch and I like it much better. 


Span; the long and short of it


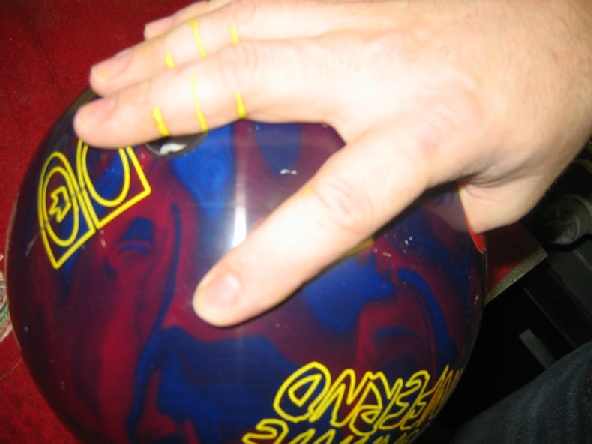
Having a span that is too long or too short can not only make it harder to perform a good release it can injure your hand over time. A stretched span pulls hard on the tendons of the fingers, hand and wrist, possibly causing injury, often requiring surgery to repair.  The stretched span can also cause problems with the thumb, requiring excessive reverse pitch in the thumbhole and large calluses at the base of the thumb. Don’t make the mistake of making the span stretched tight because you think it adds a few more revs to the ball. Over stretching your tendons is a poor substitute for a good release and you won’t be revving the ball at all if you pop a tendon.

A span that is too short can cause the bowler to squeeze the ball harder or require the thumbhole to be excessively tight. The extra squeezing can cause pain in the hand and other parts of the arm. A too short span reduces the rev rate and makes repeating shots with consistency more difficult.  

Just like all the other variables in ball fitting the criteria for a proper span has changed over the years. I think that it is most important that your span fall into a “safe zone” that will not injure your hand. If your span is in the “safe zone” then you can try it a little longer or a little shorter for your personal comfort and best performance without having to worry about injury.

 You can check your own span to see if it is in the “safe zone” by following these easy steps. (If you wear a wrist brace always make sure it is on when checking your span.)

1.      Locate the two creases at your finger joints and mark a line in the middle between the two as shown in photo.

2.      Set your ball on a table, fully insert your thumb and lay your fingers across the holes and stretch them pretty taught, then relax the hand.

3.      Once the hand is relaxed the line you drew between the two creases should fall within one eighth of an inch to the edge of each fingerhole.


Some bowlers may like their span one eighth inch longer or shorter than what I have demonstrated in the photos but don’t stray outside that “safe zone” or risk injury.


Thumb and finger pitches


I think I could write a book on thumb pitches alone but the idea behind this series is to hit the basics so I will keep it simple. First a brief explanation of what pitches are is in order. The pitch of a fingerhole or thumbhole refers to the angle the hole is drilled into the ball in relation to the ball’s center of core. For example if a fingerhole or thumbhole was drilled straight into the ball so the bottom of the hole lined up with the center of the core then that hole would have “zero pitch”. If you drill a fingerhole or thumbhole so the bottom of the hole is moved more toward the center of your grip then that hole will have “forward pitch”; conversely if the hole moves the bottom away from the center of your grip the hole will have “reverse pitch”

I like to use the example of palming a ball to help people better understand forward and reverse pitches, especially thumb pitches. If you drill the thumbhole with a lot of reverse pitch then you will be trying to palm a basketball and if you drill the thumbhole with a lot of forward pitch then you will be palming a baseball.

Obviously only those with the largest hands can palm a basketball but I think the illustration helps bowlers understand why they tend to drop the ball off the thumb if it is drilled with too much reverse pitch. Since our thumbs go “into” a bowling ball instead of around it like a baseball we can’t just drill the ball with a lot of forward pitch to make it easier to palm ether. If the pitch is too far forward for the bowler the thumb will get trapped in the hole and the ball will hang.

Finding just the right thumb pitch can only be achieved by the trial and error of drilling thumbholes. If you start with a pitch in the thumbhole that you know is too much reverse (you have to squeeze too much) and start drilling one quarter inch more forward each time you will eventually reach a thumb pitch that is too far forward and you will have trouble clearing the thumb without hanging. Once that “too much pitch” has been found then back up one eighth of an inch and try throwing that pitch for a while.

You must give your hand time to get acclimated to the new pitch each time you drill a new hole; with each quarter inch forward change your hand will have to squeeze the ball less. This will take some effort on your part because it is human nature to “over squeeze” a bowling ball. Don’t be surprised that after a while you can move the pitch more forward after your hand learns not to squeeze so much.  

If you keep your span in the “safe zone” then you will be free to move your thumb pitch forward without having to change your span. This may be a point of contention with your ball driller. The drilling industry has produced drilling charts that recommend a thumb pitch with each length of span; as the span lengths increase on the chart the thumb pitch moves slightly more reverse. Examples are a span that is four inches in length shows a recommend thumb pitch of one eighth inch forward. A span that is four and one quarter inches in length corresponds to a thumb pitch of zero.  The chart is recommending that for each one eighth of an inch the span grows the thumb pitch should be moved back (reverse direction) by one sixteenth of an inch. A problem arises when ball drillers try to reverse the chart and say that with each thumb pitch change the span must be changed as well, to correspond to the chart.

The chart may be a good starting point but most of the best bowlers in the world have thumb pitches that are more forward than the charts suggest. I know for a fact that if the span is in the “safe zone” the thumb pitch can be moved forward without changing the span; otherwise I would not have been able to take a bowler with a “safe” span of five and one half inches (big hand that guy has) from his former thumb pitch of five eights of an inch REVERSE to three eights of an inch FORWARD in just one drilling and lesson.

Before anyone starts screaming that this guy was some young buck freak of nature with a double jointed thumb or something that was not the case at all, he is a 50 year old senior PBA member with no special flexibility in the thumb.

 It is much better to only change one thing at the time so you will know exactly the outcome of each change. I am not saying that there is no relationship between the span and the thumb pitch; I am just saying they are not nearly as locked together as many people think. Once you are close to your limit on thumb pitch then you can tweak the span a little if you need too.

The reason I recently moved my own span one eighth inch longer was because the snugness of my thumbhole was just too critical and I was constantly having to add or remove tape (more than normal) and found myself having to squeeze the ball too often even with one half inch forward thumb pitch. My span was on the short side of the “safe zone” so I could add the extra one eighth inch in length and still stay in the zone. The change solved the problem and now I am finished with grip changes…for the one hundredth time.

Thumb pitches can be moved left and right as well. These are called lateral pitches and they are best used to keep you from wearing sore spots on the sides of your thumb. Although some drillers have advocated drilling larger amounts of lateral pitch to promote a certain type of release; I am not a believer in using lateral pitches to try and “force” a release. Just as a stretched span for more revs is no substitute for a good release, too much lateral pitch will not make you better ether.


Finger pitches are used to accommodate our individual fingers and usually need to be pitched more to the reverse side (away) as we get older and loose flexibility. One test to see if you could use a little more reverse in the fingers is to put your hand into the ball and notice how hard your fingernail is pressed against the back of the hole. The harder the fingernail is pressed against the back of the hole the more you need to reverse the fingers, assuming your span is in the “safe zone”.

Bowlers with high rev rates often add more reverse to the fingers to cut down on the revs a little and to keep them from “hitting-up” on the ball. Lateral pitches in the fingers can make the ball more comfortable for those that have crooked fingers due to arthritis or previous injury.


In part one of this series I shared with you my six basic fundamentals of bowling and how they are all interconnected to produce one complete bowling machine. It has been pretty much a staple in every sport that participants must have the fundamentals mastered before they can go on to become great players. It is also common to hear a great player of any sport emerging from a slump say “I had to go back and work on my fundamentals to get my game back”.

In this series of articles I would like to visit each of the fundamentals and explain what your performance expectations should be from each one and how they interact with each other to produce one big bowling machine.

The six basic fundamentals are:

1.      Ball fit and weight

2.      Armswing

3.      Footwork

4.      Timing

5.      Release

6.      Finishing position.


Fundamental #1: Ball fit and weight

As I mentioned in part one, many bowlers will be surprised that I would consider ball fit and weight as one of the fundamentals. I can guarantee you that an ill-fitting ball or one that is too heavy or too light will kill your game before you even get started. If you have doubts, I suggest you try one of the 16 pound house balls in your center and make a few quality shots. If you have a smallish hand you may even be able to try a house ball that is two or three pounds lighter than your current ball; a ball that is too light will affect your game as well.

The house ball is an extreme example, but a less-than-perfect fit of your personal ball will affect you as well; it’s just a matter of degree. One of the first things I do as a coach after observing a few warm-up shots is check out a student’s ball for fit and weight. Sometimes I can spot an ill-fitting ball right away, just by watching the bowler’s swing.

If the ball does not fit well or if it needs a few pieces of tape in the thumbhole, the hand will have to squeeze the ball tighter, which puts tension in nearly every muscle in the arm, so the armswing can not flow properly. A hand that is having to grip the ball to keep from dropping it will have a hard time letting go and performing a good release at just the right time…every time. Most bowlers have a hard time identifying the fact that they squeeze the ball too tightly because it is human nature to do so. 


The inexact science of ball fit 


I really wish I could just lay out the scientific specs of perfect ball fit so each BTM reader could check their balls, bring them into compliance, and be done with the subject. Unfortunately, that is never going to happen because ball fit is the epitome of an inexact science. The “standards” for a proper fitting ball has changed over the years and it seems that every expert has their own opinion on what is just right for any given hand.

I could send a bowler to five different drilling gurus to have their hand professionally fitted and I can guarantee you that no two balls out of the five would measure up the same. The spans, fingerhole pitches, thumbhole pitches, amount of bevel, and even the sizes of the holes will vary from driller to driller. All of the balls will feel differently to the bowler and release differently from the hand; some will work well and some may not; some may work well initially, but will develop problems over time.

Before you get the idea that I am picking on ball drillers, let me tell you that I am not. I will confess that professional coaches are the same way. A bowler can get lessons from five different coaching gurus and be told something different from each one; some may even contradict each other. Some of the suggested changes may work well and others may not, and like the ball drillings, sometimes the flaws will only show up over time; the same can be said for the good changes.

Ball drillers use all kinds of criteria when measuring your hand for a proper ball fit: things like sticking your hand into medieval-looking contraptions to measure your span, bending and twisting your fingers and thumb to see how flexible they are, some may have you pick up objects in order to see what direction your digits point or smear chicken blood on your forehead and chant in a foreign language. Ok, that last one may be a little farfetched, but ball drillers’ experience, education and understanding of how this whole hand/ball/release thing works vary greatly from driller to driller.

All of these little “tricks of the trade” drillers use have different levels of validity, but there is another aspect of this inexact ball drilling science that I feel is ignored too often. I believe that the ball should be fitted to your hand with as much attention paid to “how” you release the ball as any of the physical characteristics of your hand. For example, your hand could be fitted perfectly according to all the drilling charts for thumb pitch at one eighth inch reverse, but if you tend to squeeze the ball and hang on to it too long, you may require more reverse pitch in order to clear the thumbhole. Conversely, if you were to take a lesson from me and learn not to squeeze the ball so it releases by your ankle, then we may be able to move your thumb pitch to one-half inch forward.

Moving a thumb pitch from one-eighth inch reverse to one-half inch forward in just one drilling (and lesson) would been seen by most ball drillers as impossible, but I do it every day with great success; you won’t find that on any drilling chart.  My point is that how you release the ball is at least as important as the length of your span and your ideal grip may change as you progress as a bowler.


Criteria for a proper fitting ball


As I stated earlier, I can’t lay down the scientific specs of a perfect ball fit because there is no such thing. If you continue to pursue excellence in this wonderful sport, you will most likely be forever changing your ball fit. Even the bowlers on the Pro Tour keep the drill truck busy tweaking thumb pitches, spans and finger pitches from time to time.

You would think that the best bowlers in the world would at least have their ball fit sorted out by now, but this is a very fluid sport that is always changing. There may not be an infallible spec sheet that we can follow, but we have to start somewhere, so I will give you a few things to consider when examining your own ball fit.

First off, a proper fitting ball should feel comfortable in your hand when the ball is sitting still and in the full motion of a swing and release. There should be no pain felt in the fingers, thumb or any part of the hand that can be associated with the bowling ball. The ball should stay on your thumb with very little or no squeezing until the ball reaches the very bottom of the swing (point of release), where the pseudo centrifugal force combines with the weight of the ball to pull the ball off the thumb and onto the fingers. That last sentence is a very important one; notice it should take pseudo centrifugal force “added” to the weight of the ball to pull ball off of the thumb. The weight of a hanging ball alone should not be able to pull the ball off of your thumb if you keep your wrist straight and your grip relaxed.


The care and feeding of a thumbhole


The thumbhole of a bowling ball requires just as much care and feeding as any pet I have ever had. If you look into your thumbhole and all you see is an empty hole, then the odds of you becoming a great bowler just got a lot slimmer.

Thumbholes require a steady diet of tape (there are many types) and or Ron C’s Magic Carpet. There are several reasons an empty thumbhole spells trouble:

1.      If your thumbhole is empty and you “think” you can throw the ball pretty well, the thumbhole is likely too loose on your thumb. When the thumbhole is too loose, you MUST squeeze the ball tightly to keep from dropping it; this destroys any hope of performing a good armswing or release.


2.      If your thumbhole is empty but yet very snug fitting to the thumb, then you are in trouble also. You see, an empty thumbhole is full of air until you stick your thumb in there, which forces most of the air out of the hole as your thumb goes in. 
When you couple a snug hole with a nice soft thumb you have basically just built a syringe, those scary things the doctor uses to give you shots. Syringes are great for moving fluids in and out but they don’t make very good thumbholes.

With an empty, but snug thumbhole, everything looks and feels just fine if you just set your ball on a table and pull your thumb in and out. The difference shows up when you actually throw the ball and the thumb needs to exit very quickly; the low pressure area in the bottom of the thumbhole will try to keep the thumb from coming out due to suction. Sometimes this suction is so subtle you can’t feel it and other times you can, even making a popping sound. One clue this may be happening to a bowler is the use of a slick powder on the thumb like EZ Slide. More about venting the thumbhole for a quick release later. (Note: a popping sound from the fingers is fine.)


3.      Most bowlers’ thumbs change size at least a little from day to day or even game to game. I could never stress enough how important it is for the thumbhole to perfectly fit the thumb at all times. In order to keep the thumbhole fitting perfectly, you must change its size using bowlers tape, Ron C’s Magic Carpet or some other means. If you have something like that in your thumbhole then your thumbhole will not be empty.


Taping the thumbhole


Taping the thumbhole needs to accomplish two things:


 #1: Create an airway so the thumb can move in and out without changing the air pressure in the thumbhole.

Many bowlers know to use tape to take up space in the hole, but most don’t know that it should also function as an air pressure equalizer. It takes at least three pieces of white tape layered on top of each other to produce two tiny airways on each side of the layered tape. This is about the bare minimum of airflow necessary to get a quick clean release from the thumb if the hole is snug, so keep this in mind when sizing your thumbhole.

You need to maintain at least three pieces of tape layered in the ball even when the thumb is swollen. It is ok to add as many pieces of tape as necessary to tighten the hole when the thumb shrinks, but I don’t think it is a good idea to have more than five pieces of tape in the front of the hole. Too many pieces of tape in the front will start to change the span and thumb pitch. If you don’t have room in your thumbhole for at least three pieces of tape after your thumb swells you can ether open the hole up or have your driller dill you a tiny vent hole.
            A vent hole is a tiny hole that is placed beside the thumb and exits near the bottom of the thumbhole. Vent holes used to be popular years ago and are covered by USBC rules, but they have disappeared over time; modern thumb slugs have vent holes built into them, but they often get clogged after being installed into the ball.
Ron C’s Magic Carpet is designed to flow air all around and through the product so only one piece is used.

#2 Keep the thumbhole the exact right fit.

Tape is added or removed to keep the thumbhole the exact right fit for the thumb as the thumb changes size. Very few thumbs (if any) are always the same size so something must be added or subtracted from the thumbhole to keep the fit perfect at all times. Tape can be added to the front of the thumbhole or the back or both. Ron C’s Magic Carpet always goes in the back of the thumbhole so white tape can be added to the front of the thumbhole if needed. I think that all tape should be placed at least one-forth of an inch below the top of the hole and each added piece should be placed one-sixteenth of an inch below the previous piece for easy removal.

Keep in mind that the “front” of the thumbhole means where the pad of the thumb comes in contact with the thumbhole, so it is usually a little offset from the very top of the hole. The “back” of the thumbhole refers to where the knuckle of the thumb comes in contact with the thumbhole and again this is usually offset from the center of the bottom of the hole.


How tight should the thumbhole be?


In my opinion, the thumbhole should be tight enough that you don’t have to squeeze the ball during the swing but not so tight that you have to really force your thumb into the ball.

From my experience, there are a lot more bowlers that have their thumbholes too loose than too tight or just right. I can’t tell you how many times I will tell a student that I need to add a couple pieces of tape to their ball only to hear them say “Are you sure? My thumbhole is pretty tight.” After adding five or six pieces of tape and noticing a marked improvement in the armswing and release, the student starts to understand that their thumbhole was too loose. They were not aware they were using the Kung Fu Death Grip because if feels natural and normal, but it wrecks havoc with the swing and release.


Finding the right snugness is really a simple exercise. Start with the thumbhole a little too loose and add tape until you feel the ball hang a little on the thumb after a few full speed releases, then take a piece out. Keep in mind that with each added piece of tape, you can squeeze a little less so you may want to throw several shots and allow your hand to relax a little before you decide to take a piece out. Don’t stop adding tape just because you feel like you have added a lot. If at the end of the process you find that you had to add seven or more pieces of tape, you may want to consider dropping your thumbhole size one notch the next time you drill a ball.

Many times during this process bowlers will discover that by the time they add enough tape to the hole to reduce squeezing a significant amount, they can hardly get their thumb into the hole any longer because it is so tight. If your thumbhole is so tight that you have to force your thumb into the hole, then you most likely need to move your thumb pitch more forward. With the thumb pitch moved more forward, the hole will not have to be as tight to stay on your thumb.

In part three of The Six Basic Fundamentals, I will get into thumb and finger pitches and spans. In the mean time, try to get the snugness of that thumbhole just right.