Learning New Releases: Part 2
In “Learning new releases part 1” I left you
standing at the foul line in your finishing position gently swinging the ball
with your hand in the 45 degree position. At this point, if you never saw part
#1 you are going, “Huh?” Don’t worry if you missed part #1 it is in my archive
and here is a direct link to "Learning new releases part 1".
In a short review, I will say that I have found
it best to learn releases in reverse. This means starting with the finish.
First, your hand needs to learn where the fingers, thumb, and hand are at the
point of release. The first release we are learning is the simplest hook
release.
|
In this
release, when the ball is ready to leave the hand the fingers are in the 45
degree position as indicated by photo "B". The fingers are located
directly below the thumb. This will produce an axis of rotation (AR) of 45
degrees and very little axis tilt. If you are not familiar with the terms
“AR” and “axis tilt” refer to part one of “Learning new releases”. |
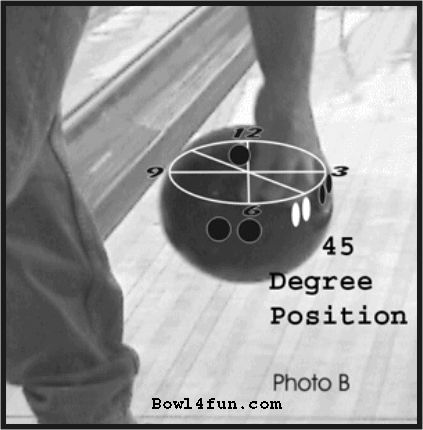 |
To learn the release, get in your
finishing position at the foul line and simply hold the ball straight down by
your side (photo B). Put your fingers in the 45 degree position and do not allow
your wrist to bend back from the weight of the ball. If your wrist is not strong
enough, consider using a lighter ball or a wrist brace.
Make sure your thumb is directly above the fingers and gently
start swinging the ball. Keep and eye on your hand as you swing to make sure
your hand stays put. On about the 3rd swing, simply let the ball fall
off your thumb and follow it with your fingers. The key here is to keep the
swing very slow and easy. If you try to throw the ball hard you may botch the
release.
If you perform the release properly, the ball should leave
the hand with 45 degrees of “AR” and have very little axis tilt. If you are able
to produce the same positive result each time the ball leaves your hand, it is
time to move on to the next step.
|
The next step
is to hold the ball about waist high and preposition your hand so a simple
drop into a swing will produce the 45 degree position. Then simply drop the
ball into a free swing and perform the release as in photo “C”. |
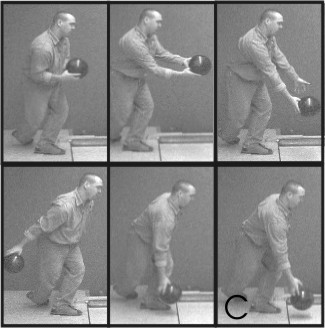 |
The ball’s rotation and axis
tilt should look the same as before, only with a little more ball speed. Try
very hard not to add any muscle forcing the ball forward. The idea is to allow
the ball to swing from its own weight and keep things very slow. I can’t express
enough how important “slow and easy” are to teaching the hand new releases. As
soon as you speed things up, your hand’s muscle memory will kick in and try to
perform the release it already knows instead of the one it is trying to learn.
Once you are satisfied you have
the release conquered standing still at the foul line, it is time to give
walking a try. It is very important that you do NOT do your normal approach. If
you do anything resembling your normal approach, your old muscle memory will
kick in again.
The technique I use to get a
student’s feet moving is called “Going For A Walk”. I take the student all the
way off the approach…about 3 feet off. I then have them hold the ball in the
waist high “45 degree set” position and have them very slowly start walking
toward the foul line. When they are about 8 feet away, I have them put the ball
into a slow easy swing as they continue walking and try to just end up on the
correct slide foot and deliver the ball as they did before.
This takes a little coordination and not
everyone can do it. If you can’t do it on the first try don’t give up keep
trying. Again, the KEY here is walk and deliver the ball very slowly. As soon as
you speed things up, your old muscle memory will kick in. After a couple
successful walks and deliveries, try ending up in a very correct finishing
position and deliver the ball.
If you are lucky, you will be able to
“Go For A Walk” and deliver the ball with the 45 degrees of axis rotation and
very little tilt just as you did standing still at the foul line. If you are
successful after about 8 deliveries, then move forward one foot and go for a
walk again. If you mess up two deliveries in a row then retrace your learning
steps by going back to the foul line for a few standing still releases until you
get it right. Then go for a walk again. When you can do 5 perfect “Go For A
Walk” delivers then move up one foot again. Keep moving up one foot at the time
until you sneak up on your normal starting position. Make sure that you are
keeping your walk and swing very slow. Even when you make it up to your normal
starting position, don’t try to go full speed yet. Keep it slow for 4 or 5
shots.
If you have had success at this point,
go ahead and try a normal approach. If you are able to perform the release
that’s great; but if you can’t, retrace your steps, going all the way back to
the foul line if you have too. If you are like most people, even after you throw
it correctly a few times the release will start slipping away. As soon as that
happens retrace your steps again.
Learning to retrace your steps is an important
part of learning anything new in bowling. During the learning phase you must
keep everything slow, at least half your normal speed or your old muscle memory
will kick in. It takes a long time and a lot of slow releases for some people’s
hands to learn new movements so you must have
patience.
Axis Tilt
Too
much axis tilt will be one thing to watch out for once you get up to full speed.
Too much axis tilt will make the ball have a hard time “reading” the lane.
Excessive axis tilt is caused by the fingers going around the thumb instead of
taking a position directly below the thumb at the point of release.
|
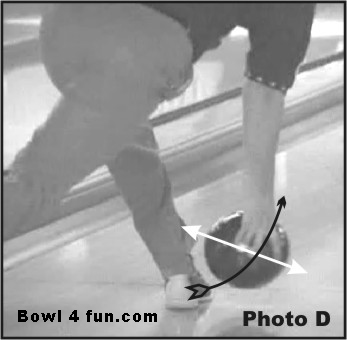
In photo D you can see a white line running through the ball. This white
line represents the balls axis and you can see the left side is tilted up
and the right side is tilted down. The black arrow shows the path the
fingers will take as the release takes place.
If the bowler in Photo D releases the ball with his fingers in that position
and follows the path of the black arrow then that is the axis tilt the ball
will have when it goes down the lane.
|
 |
|
The bowler
in photo E has it right. The fingers move to a position (black arrow)
directly under the thumb and then come up through the ball.
This will
produce very little axis tilt as shown by the white axis arrow. |
 |
Many bowlers get AXIS TILT and AXIS
ROTATION confused and they are two totally different things. I covered AXIS
ROTATION in "Learning New Releases: Part 1". I hope
these illustrations help to clear up any confusion.
My email address is
rclifton@triad.rr.com
Stop in the bowl4fun.com chat room and say hi. Ron Clifton is in
there most nights from 11PM to Midnight Eastern Time