Archive
of past tips
The
Bowler’s Release
The bowler’s
release is the “grand finale” of the approach. You can do everything with
the precision, timing, and grace of a ballet dancer and have it all botched by a
poor release. Just like the rest of the approach, there is no one best way to
release a ball.
In fact, I believe
in learning to release the ball many different ways to match up with the lane
condition. One of my specialties as a bowling coach is to teach bowlers
different releases to meet the demands of PBA or megabuck tournament oil
patterns. A wide variety of releases
should only be learned after you have perfected a very good basic release.
The best basic
release in my opinion is the one being used by many of the top players on the
pro tour. This is demonstrated well by Chris Barnes. If you ever watch Mr.
Barnes bowl, you will see that he has a very effective ball with plenty of revs.
He does this with very little effort or force. This allows him to repeat shots
and have a very predictable ball reaction. I could never stress enough how
important a predictable ball reaction is.
Easier said than done? Yes of course. Most worthwhile things are. Can anyone
learn to do it? No, I won’t kid you about that; but the closer you get, the
better, if your goal is to be a better bowler. I know you want to be a better
bowler or you wouldn’t be reading this.
Do you have to be
super strong? No, but you do need some strength in the wrist. Not everyone has
that. Some people do and just don’t know it. Those people just have a
“lazy” wrist. Others can be
helped some by using a wrist brace. You can never do the release exactly right
using the wrist braces that I have seen, but again, the closer the better.
To test your wrist
hold your ball down by your side with your palm facing forward and your wrist
relaxed. Then cup your wrist forward and count to 10 slowly. If you can hold
your wrist cupped that long then your wrist is strong enough. If you can’t
then I suggest you consider a lighter ball if you goal is to have a good strong
release. Throwing a weight that your wrist can support is much more important
than throwing a heavy ball.
|
The wrist test
To check if your wrist is
strong enough hold the ball by your side with your wrist relaxed. |
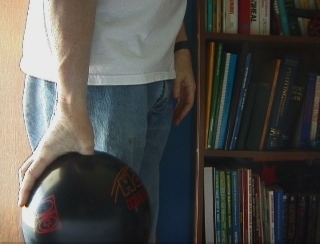
Picture "A"
|
|
Cup your wrist forward and hold
it there for a slow count to 10.
If your wrist is strong enough to do this then it is strong enough to
perform a good release. Many people have the strength, but still allow
their wrist to bend back during the swing like picture "A"
above. These people just have a lazy wrist.
If your wrist is not strong enough to perform this test you should
consider a lighter ball. |
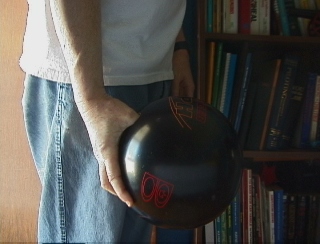
Picture "B"
|
The first step in learning this release is
at the very beginning, with your grip on the ball. To have a good, clean,
consistent release, it’s imperative that you don’t squeeze the ball in your
stance. The holes in the ball are called “gripping holes” and that is the
worst thing we could have ever called them. You need to hold the ball like you
are holding a baby bird or an egg in your hand. If your ball fits properly you
should not have to squeeze the ball anywhere in the swing or during the release.
If the ball wants to slide off of your thumb, unless you squeeze it, then add
tape or Ron C’s Magic Carpet to the hole to snug it up. If
your thumb wants to slide out no matter how tight you make your thumb, then have
your pro shop check your pitches. You may have too much reverse pitch or some
other improper fit. Remember, if you squeeze the ball, you have to
subconsciously tell yourself to let go. There is no way you are going to be able
to do that the same every time. The more pressure on you to make a good shot the
more likely you are going to hang on to the ball too long.
Once you have your grip sorted out
it’s time to get started. Start with your hand under the ball in your stance
and have your wrist cocked to the left (right handed). Spread your index finger
about 1 ½ inches. With your wrist cocked, your index finger should be pointed
almost straight ahead toward the pins. This should be a moderate amount of cock
in your wrist so even those with little flexibility should be able to do it.
Cup your wrist a
little as this will help get the weight off of your thumb at the bottom of the
swing and help you keep your wrist firm. In picture "A" above you can
see with the wrist bent back that part of the weight of the ball will be resting on the base of the thumb. In picture "B" you can see that the
weight can be carried in the fingers. With a cupped wrist and a proper fitting
ball the ball will hang onto your hand until the release. There is no need to
squeeze the ball.
|
The starting position
The hand is under the ball.
The wrist is cocked a little to the inside. The index finger is spread and
pointing almost straight ahead. The wrist is also cupped a little.
Note: I
am a firm believer of getting as much weight as possible in the
non-bowling hand. In picture "C" I am holding all the weight in
my bowling hand just to best show the starting position |
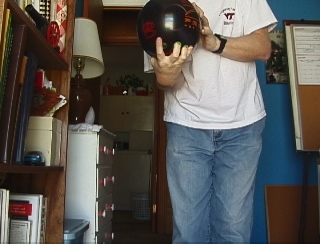
Picture "C"
|
During the push-away and
the-ball-falling-into-the-swing, keep your wrist cocked and cupped. When the
ball reaches the bottom of the swing after the push-away, your wrist should
still be cocked toward the inside and your index finger should be pointing
straight down. You can use the index finger to help
support
the weight of the ball and to take some pressure off your cupped wrist.
|
Here
in picture "D" the bowler has just dropped the ball into the
swing. The fingers are on the inside of the ball a little showing that the
wrist is cocked. The weight is being carried in the fingers because the
wrist is cupped a little. The index finger is spread and can be pressed
against the ball to help to support the weight and take a little pressure
off of the wrist. |
Picture "D"
|
No matter what you do with the
ball at the top of your swing, make sure that you get your hand back in this
same position before the bottom of the swing. For most people, it’s best if
they just maintain this cocked, cupped and index finger down position from the
push-away to just before the time to release the ball. As the ball nears the
bottom of the swing, (coming down from the back swing) you start un-cocking and
un-cupping your wrist and slightly turning the ball until the ball leaves your
hand. I know this sounds complicated, but stay with me. This motion should start
no sooner than when the ball passes your hip. The very best players with the
strong wrist can wait until the ball nears the heel of their slide foot. The
strength of your wrist and forearm will determine how late you can start the
motion. Most people start turning
the ball way too soon and that causes them to lose revs. I am not saying that
you can’t bowl great without being a high rev player, but I see a lot of
players that are trying to get more revs by lifting the ball with the fingers
past the toe. This causes an inconsistent ball reaction on anything but the
easiest of lane conditions.
The proper
motion is often described as turning a door knob and indeed that is not too far
from the truth. If you walk up to a door knob with your palm up, your wrist
cocked and cupped and turn the knob you will be close to the right motion. The
only difference is your arm is not traveling forward at the same time. You
don’t have to turn the ball much more than it takes to open the door ether,
unless you need more axis rotation. A lot of people think they have to
turn the ball a lot to get the revs on it. That’s not the case at all. Another
description of the motion is to take a football and lay it in the palm of your
hand. Cup and cock your wrist and put the seams of the football under your
fingers. Throw the football underhanded and make it spiral toward the catcher.
The only bad thing about using the football is the release will happen past the
toe, but it may help train your hand.
|
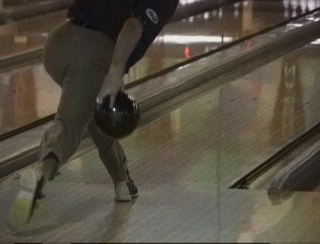
Here
the bowler is starting his slide. You can see the wrist is still in the
cocked-cupped-finger spread position. The ball is beside his hip and no
turn is taking place yet. A lot of bowlers start turning the ball here
which robs them of revs. |

Picture "E"
|
|
Picture "F"
|
Picture "G"
|
|
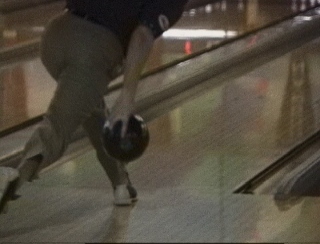
As the
ball nears the heel of the slide foot the player starts to "turn the
door knob". A bowler with a weaker wrist may have to start turning in
the position of picture "G". |
Picture "H"
|
|
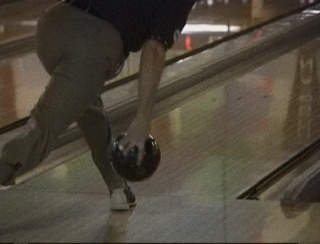
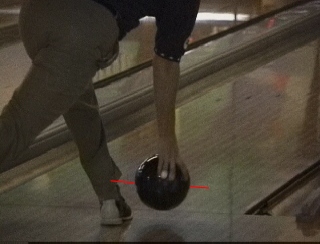
As you
turn the ball the wrist starts to un-cup which allows the thumb to escape
quickly
The red line indicates the axis
of the ball. If the player keeps his wrist cocked like this the result
will be a lot of axis tilt. |
Picture "I"
|
|
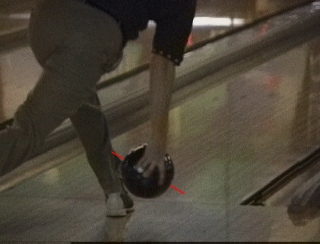
The
ball reaches the toe of the slide foot. The wrist is completely un-cocked
and un-cupped. The fingers just go straight up through the ball with
little more than just the momentum of the arm swing. No extra jerking up
to cause an under/over reaction. The red line showing the axis has moved
to a position showing much less tilt than in picture "I".
Notice
that from picture G - J the fingers only rotated around the side of the
ball less than 4 inches. For a greater axis of rotation the fingers would
have to rotate around the ball just a little more. |
Picture "J"
|
The next step is to make sure you are ready to release the ball at the right
time. This is called release timing. You have to time your arm swing and foot
work so you are able to clear the ball by the end of your sliding foot’s toe.
Often this will just mean that you have to be willing to let go of the ball much
sooner than you think. Most people that have less than ideal releases stay in
the ball too long. If you don’t squeeze the ball, it will be much easier to
learn an early release. At first, it doesn’t feel natural at all for us to
release the ball by the ankle. We want to “throw” the ball within our
vision. In all sports (except bowling) involving a ball that is thrown,
the release takes place out in front of us where we can see it. In bowling, the
best release is completed by the end of our noses. This takes some getting used
to and a bit of trust. If you stay in the ball much past your toe, then you take
a chance on altering the ball’s path. A ball released by the ankle is a little
less fussy about timing and will stay on course.
The only real muscle involved in this release is keeping your wrist
cupped until its time to unwind it. The beauty of the release is that you can
generate a good amount of revs without even trying. The revs come from just
having your hand in the right position at the right time and teaching your wrist
when to un-cock and un-cup and turn slightly. We don’t have to use much muscle
because we are making use of the kinetic energy already built into our arm
swing.
Bowl great!
I can be contacted through email at rclifton@triad.rr.com