LEARNING
NEW RELEASES (Part 4) - HOW THE PROS REV IT UP
In part 4 of this 4 part series I am gong to answer the question I am ask
the most. How do the pros get so many revs on the ball? Actually the question
usually is how can “I” get more revs on the ball, but the answer to both
questions is the same.
If you are gong to learn to rev the ball then you need to learn the right
way. The technique the pros use requires the least amount of muscle (although a
strong wrist helps) and provides the best ball reaction. If you watch the pros
on TV or if you are lucky enough to see them in person you will notice that the
revs they obtain are nearly effortless.
Before I tell you what they do do I want to tell you what they don’t
do. They don’t really “lift” or jerk up on the ball as we were all taught
years ago. They don’t keep their wrist cupped all the way through the shot and
they don’t squeeze the ball.
That last one is a real gem, not squeezing the ball. If you are a
frequent reader of my articles you will know I harp on this a lot. Squeezing the
ball is a real rev killer and is one source release inconsistencies.
The first step in learning to rev it like a pro is to make sure grip is
well sorted out, especially the thumb hole. The thumb hole must be set up so you
can totally relax your hand and the ball not fall off too soon unless you
squeeze. This usually takes some drilling and re-drilling of thumb hole pitches
to get it just right. I will give you a hint, most thumb holes have too much
reverse pitch in them. As your release gets better and you learn not to squeeze
don’t be afraid to try forward pitches in the thumb hole.
Once you have your grip and thumb hole pitches sorted out it’s time to
head out on the lane to turn some revs. At this point a smile comes to my face
because I get emails from all over the world wanting to know what comes next. I
can just see the guys in
Step #1: The cocked wrist.
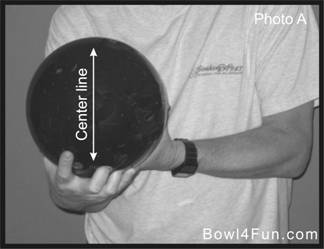
At some point during the swing you must cock your wrist to the inside. In most cases it is best to go ahead and cock your wrist in the stance and hold that position. In photo “A” you can see that cocking your wrist to the inside places your fingers inside the center line of the ball.
If you spread your index finger a little you will notice that it will then be pointed straight ahead. If you can “feel” the location of your index finger throughout the swing that will be helpful during the learning process.
Step #2: Relaxed
grip
It is very important that we now totally relax our grip on the ball and keep it relaxed until the ball leaves our hand. If you have never thrown a ball with a relaxed grip it takes a lot of practice because you have to build up a trust that you will not drop the ball. Cocking the wrist to the inside (step #1) helps to lock the ball onto your hand and there is no way the ball can fall off as long as you have your grip and thumb hole sorted out.
Step #3: Cupping the
wrist
Cupping the wrist does several wonderful things for us. The first thing it does is put a little tension into our hand. This should be all the tension we need in the hand to perform a high rev release. I will cover another benefit in the next step.
Step #4: Maintain
position
It is very important that we maintain this cocked, cupped and relaxed position of the hand as it drops into the swing. Your instinct will tell you to squeeze the ball as it nears the bottom of the swing. You must fight this urge to tighten up the hand and let the ball swing on up into the backswing.
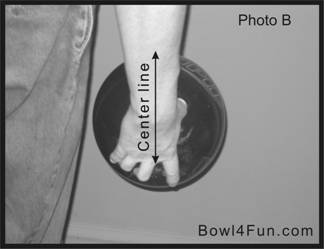
This is another place where we get a benefit from having the wrist cupped. That way the ball’s weight can rest more in the hand and on the fingers. If you allow your wrist to bend back much of the ball’s weight will transfer to the thumb which could cause you to squeeze (Photo B). You actually have a freer arm swing if you allow the wrist to open because it takes the tension out of the arm. The problem is that would mean that at some later time in the swing you would have to close the wrist back up before the release. That takes extra timing and makes the release even more complicated.
Step#5: Fingers stay
inside
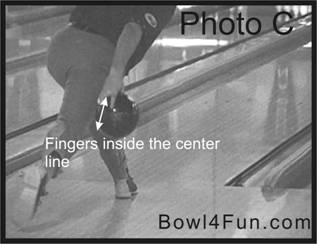
Once the ball starts falling from the top of the backswing it is
important to maintain position just as in step #4. In photo “C” you can see
that the ball is not too far from the release point but the bowler keeps the
fingers inside the center line. This is where that “feel” of the index
finger staying behind the ball can be very helpful as I mentioned in step #1.
This is the first point where most bowlers start to fail. They start moving the fingers around to the side of the ball. This will put the fingers in their finishing position way too early robbing the player of revs. If you can “feel” that index finger staying directly behind the ball that will help you learn not to turn early.
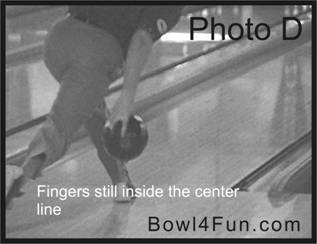
Step #6: Still
waiting
In photo “D” you can see the ball is getting pretty close to the
slide shoe but the bowler is still maintaining position.
Step #7: Turn, Un-cup, Un-cock & Follow
This is the
point where things start to happen fast. Once the ball reaches the heel of the
slide shoe a high rev player will start to turn the ball, un-cock and un-cup the
wrist. This is all one smooth motion that must happen very quickly. Weak wrist
need not apply here.
This next sequence
of photos shows all of this in action. In photos “E” and “F” the bowler
is starting to move his fingers over toward the 45 degree position I wrote about
in part 1 of “Learning new releases. The wrist is starting to un-up and the
thumb is starting to exit the ball.

Since the bowler is not squeezing the ball with his grip the ball will fall off of the thumb onto the fingers just before the bowler’s ankle. This is the most powerful position in relation to the rest of the body for the release to take place.
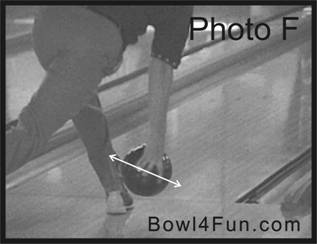
Photo “F” also shows a white
line with two arrows on each end. This is the axis of the ball and you can see
it is “tilted” up on the left side. When most bowlers try this release for
the first time they have this type of axis tilt after the release takes place.
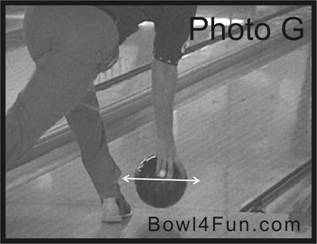
In photo “G”
the wrist is totally un-cocked, un-cupped and the fingers have taken their
position under the thumb to reduce the axis tilt. The white line shows that only
a small amount of axis tilt is left as the fingers come up through the ball and
the arm follows through.
Bowlers that perform this type of release always have a follow through that goes up toward their face. They usually make a circle out of it toward the outside so they won’t actually hit themselves in the face. This off line follow through does not really alter the path of the ball very much because the ball is off of the hand so early.
Where do all the
revs come from?
The extra revs come from the momentum generated by quickly bringing the fingers from the inside of the ball to the outside at the last second and then up through the ball for the follow through. The average bowler with less revs already has his or her fingers in the position shown in Photo “G” long before the ball nears the release point. High revs is not always the best way to go but it is nice to be able to rev it up if the conditions call for it.
Be sure to check out my website www.bowl4fun.com for more articles and details as well as a live bowlers’ chat room each night after 11 PM Eastern Time. My email address is rclifton@triad.rr.com. If you email me please include the town and state you live in.